Errors and problems are something that we all face them sooner or later. However, these errors should not prevent us from trying or experimenting with something new. One of the strange issue that many users face is that when trying to login to WordPress, an SSL error is occurred. In this post, you’re going to learn how to fix SSL error when you’re unable to login to WordPress admin (or Dashboard).
So let’s take a look at all these SSL related problems in WordPress, along with their solutions.
SSL certificate
Have you recently activated SSL certificate on your site and are unable to login to WordPress? In such a case, ensure that you’ve correctly configured SSL certificate and settings related to it. Improperly configured SSL certificate may cause login issues.
Edit your wp-config.php file
Some users make changes in: Settings > General, and update WordPress Address (URL) and Site Address (URL) from there. By mistake, you might have added HTTPS to the URL. For example; https://yoursite.com instead of http://yoursite.com
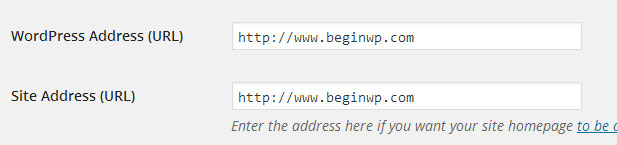
If you’ve made these changes, then you won’t be able to login to WordPress. That’s why, you’ll now need to use a FTP client like Filezilla, or use your cPanel’s File Manager and edit your wp-config.php manually. Add these lines to your wp-config.php
define(‘WP_HOME’,’http://example.com’);
define(‘WP_SITEURL’,’http://example.com’);
define(‘WP_SITEURL’,’http://example.com’);
Add these lines just before:
/* That’s all, stop editing! Happy blogging. */
Also replace example.com with your own domain name.
Check your .htaccess file
In your site’s root directory, such as domain.com/public_html, you’ll find a file named as .htaccess. In some cases, it might be hidden and you’ll need to checkmark “view hidden files” in the cPanel’s File Manager.
Ensure that your .htaccess looks like below:
1
2
3
4
5
6
7
8
9
10
11
| # BEGIN WordPress<IfModule mod_rewrite.c>RewriteEngine OnRewriteBase /RewriteRule ^index\.php$ - [L]RewriteCond %{REQUEST_FILENAME} !-fRewriteCond %{REQUEST_FILENAME} !-dRewriteRule . /index.php [L]</IfModule># END WordPress |
If it doesn’t looks like this, then edit it and make the required changes.
Forcing HTTPS login in WordPress
Have you recently made any changes to the wp-config.php file to force HTTPS on the login page of WordPress.
define(‘FORCE_SSL_LOGIN’, true);
define(‘FORCE_SSL_ADMIN’, true);
If you’ve added any of the above constant in the wp-config.php file, then remove it from there.
define(‘FORCE_SSL_ADMIN’, true);
If you’ve added any of the above constant in the wp-config.php file, then remove it from there.
Disable all plugins
Some security plugins such as iThemes Security (previously known as Better WP Security) have an option to force SSL on your site for only admin page, and for all pages or posts. If you’ve checkmarked this option in the plugin’s page, and if your server doesn’t supports SSL, then you won’t be able to login to WordPress because of SSL error. What now?
That’s where you’ll need to deactivate all plugins, or you can also rename one plugin at a time to see if that has solved your problem. Renaming the plugin will instantly deactivate the plugin, and that’s why problems arising out of that plugin will be fixed.
To disable all plugins at once, use FTP client or your host’s File Manager and navigate to wp-content folder. Rename the “plugins” folder to “plugins.hold”. This will deactivate all plugins instantly. If you’re now able to login then it means that a plugin is the culprit, and in such a case you’ll need to find that plugin and remove it.
Edit your WP_Options table
From your cPanel, login to your phpMyAdmin, go to your WP_Options table where you will find your site URL and home URL starting with HTTPS. You just need to edit it back to HTTP (by removing the “S”).
So go ahead and follow these methods when you’re getting SSL error on login page of WordPress. Hopefully these tips should be able to help you solve your problem.
Note: To help you fix your everyday WordPress problems and errors, we’ve also started a new WordPress troubleshooting section.