Showing posts with label wp. Show all posts

Thursday, April 10, 2025

Mengapa Gambar Tidak Muncul di Dashboard Media WordPress Setelah Disalin Manual? Ini Solusinya!

Penjelasan Lengkap:
Artikel ini membahas masalah umum saat gambar yang disalin secara manual ke folder uploads WordPress tidak muncul di dashboard media. Simak penyebab dan solusi step-by-step untuk mengimpor gambar ke database WordPress menggunakan WP-CLI, termasuk cara menghindari file thumbnail dan skrip khusus untuk efisiensi.


Isi Artikel

Penyebab Gambar Tidak Muncul

  • Entri Database Hilang: WordPress tidak mengenali gambar tanpa entri di database.

  • File Thumbnail Mengganggu: File dengan pola -768x1024.webp (thumbnail) tidak perlu diimpor ulang.

Solusi dengan WP-CLI

  1. Akses Server via SSH:

    bash
    Copy
    ssh username@server_ip -p port_number  
  2. Masuk ke Direktori Uploads:

    bash
    Copy
    cd /home/ccc.id/aaa.ccc.id/wp-content/uploads/2025/02/  
  3. Jalankan Skrip Impor:

    bash
    Copy
    for file in *.webp; do  
      if [[ "$file" != *-[0-9]*x[0-9]*.webp ]]; then  
        /usr/bin/wp media import "$file" --allow-root  
        echo "✅ Selesai: $file"  
      else  
        echo "⏩ Dilewati: $file (thumbnail)"  
      fi  
    done  

Hasil yang Diharapkan

  • File asli (non-thumbnail) akan muncul di dashboard media.

  • Thumbnail otomatis di-generate oleh WordPress.


Tips Tambahan

  • Perbarui WP-CLI jika ada error parameter:

    bash
    Copy
    sudo wp cli update --stable --yes  
  • Bersihkan Cache: Setelah impor, jalankan:

    bash
    Copy
    wp cache flush --allow-root  

Penutup:
Dengan skrip ini, gambar yang disalin manual bisa diimpor ke database WordPress dalam hitungan menit. Pastikan nama file tidak mengandung karakter khusus, dan server memiliki sumber daya memori yang cukup! 🚀

🔧 Baca Juga:

Wednesday, December 14, 2022

There has been a critical error on this website. Learn more about troubleshooting WordPress.

 Jika muncul pesan di wordpress:

There has been a critical error on this website.


Learn more about troubleshooting WordPress.


maka : 

aktifkan atau set ke true debug di wp-config.php


nanti akan muncul pesan kesalahan seperti :

Fatal error: Uncaught Error: Call to undefined function mysql_connect() in /home/namadomain.com/public_html/wp-includes/class-wpdb.php:1807 Stack trace: #0 /home/namadomain.com/public_html/wp-includes/class-wpdb.php(734): wpdb->db_connect() #1 /home/namadomain.com/public_html/wp-includes/load.php(562): wpdb->__construct() #2 /home/namadomain.com/public_html/wp-settings.php(124): require_wp_db() #3 /home/namadomain.com/public_html/wp-config.php(99): require_once('/home/namadomai...') #4 /home/namadomain.com/public_html/wp-load.php(50): require_once('/home/namadomai...') #5 /home/namadomain.com/public_html/wp-admin/admin.php(34): require_once('/home/namadomai...') #6 /home/namadomain.com/public_html/wp-admin/index.php(10): require_once('/home/namadomai...') #7 {main} thrown in /home/namadomain.com/public_html/wp-includes/class-wpdb.php on line 1807

There has been a critical error on this website.


Learn more about troubleshooting WordPress.


Solusi :

masuk ke dashboard hosting yg menggunakan cyberpanel 

ubah versi php ke 7.4 atau yg sesuai

kemudian rewrite rule diklik dan save


hasil

hasilnya akan normal kembali.


Wednesday, August 11, 2021

Wordpress rename uploaded images based on the post_title

 https://stackoverflow.com/questions/63571688/wordpress-rename-uploaded-images-based-on-the-post-title


This code works with post types (posts, pages, products). Change filename and ads alt, title, caption and description meta to image.

But when its about attributes, categories keeps the filename and add it to alt, title, etc.

function file_renamer( $filename ) {
    $info = pathinfo( $filename );
    $ext  = empty( $info['extension'] ) ? '' : '.' . $info['extension'];
    $name = basename( $filename, $ext );


    if( $post_id = array_key_exists("post_id", $_POST) ? $_POST["post_id"] : null) {
        if($post = get_post($post_id)) {
            return $post->post_title . $ext;
        }
    }
    
    $my_image_title = $post;
    

    $file['name'] = $my_image_title  . - uniqid() . $ext; // uniqid method
    // $file['name'] = md5($name) . $ext; // md5 method
    // $file['name'] = base64_encode($name) . $ext; // base64 method

    return $filename;


  }
add_filter( 'sanitize_file_name', 'file_renamer', 10, 1 );

/* Automatically set the image Title, Alt-Text, Caption & Description upon upload
--------------------------------------------------------------------------------------*/
add_action( 'add_attachment', 'my_set_image_meta_upon_image_upload' );
function my_set_image_meta_upon_image_upload( $post_ID ) {

    // Check if uploaded file is an image, else do nothing

    if ( wp_attachment_is_image( $post_ID ) ) {
        
       // Get the parent post ID, if there is one

        if( isset($_REQUEST['post_id']) ) {
          $post_id = $_REQUEST['post_id'];
          } else {
          $post_id = false;
          }


            if ($post_id != false) {
        $my_image_title = get_the_title($post_id);
            } else {
        $my_image_title = get_post( $post_ID )->post_title;
            }
        // Sanitize the title:  remove hyphens, underscores & extra spaces:
        $my_image_title = preg_replace( '%\s*[-_\s]+\s*%', ' ',  $my_image_title );

        // Sanitize the title:  capitalize first letter of every word (other letters lower case):
        $my_image_title = ucwords( strtolower( $my_image_title ) );

        // Create an array with the image meta (Title, Caption, Description) to be updated
        // Note:  comment out the Excerpt/Caption or Content/Description lines if not needed
        $my_image_meta = array(
            'ID'        => $post_ID,            // Specify the image (ID) to be updated
            'post_title'    => $my_image_title,     // Set image Title to sanitized title
            'post_excerpt'  => $my_image_title,     // Set image Caption (Excerpt) to sanitized title
            'post_content'  => $my_image_title,     // Set image Description (Content) to sanitized title
        );

        // Set the image Alt-Text
        update_post_meta( $post_ID, '_wp_attachment_image_alt', $my_image_title );

        // Set the image meta (e.g. Title, Excerpt, Content)
        wp_update_post( $my_image_meta );

    } 
}

I was try to find a way to take the title from attribute or category name to add it to metas but no luck. If you have any idea i do appreciate it. I'm not so good to WordPress codex.

Hope this code help.

Saturday, July 17, 2021

Solution for WordPress WP-Options Issue – Database Upgrade Required

 Solution for WordPress WP-Options Issue – Database Upgrade Required

If your blogging platform is WordPress and your webpage is redirecting to a page where you are getting a message as “Database upgrade required” even if your wordpress and database is up to date then read the instruction provided below to resolve the issue.

Problem Scenario: Webpage URL redirected to a WordPress page where the instruction appears as “Database upgrade required” or Installation Window for WordPress appears even the wordpress is already installed and up to date. The message appearing is that  “your wordpress database is out-of-date, and must be upgraded before you can continue”.

database upgrade 1

Solution:

This is a common problem with WordPress and you don’t need to be afraid of data loss. If you will browse your wordpress database, you will find that all your posts, pages, plug-in, themes are available at their places and nothing go deleted. This is a problem related with a table named as “WP_Options” of WordPress database. The wp_options table contains some general information related to the blog which appears in the setting tab of admin. It also contains some information about the plug-in installed for the blog.

There are mainly two reasons for this issue in your WordPress blog.

  1. The Option Name db_version in WP_Options table is not equal to the field wp_db_version of version.php. You can have a look at the Version.php located under wp-include folder of your wordpress blog.
  2. The Option Name “siteurl” in WP_Options table is not populated properly.

Follow the below mentioned steps to resolve the issue-:

  • Open the phpMyadmin from your blog’s host to have a look into the WordPress database
  • Browse the table WP_Options to see the Option_Value for the Option_Name db_version. For WordPress version 2.7.1, the db_version should be equal to 9872. Other db_versions are as below,
  • WordPress Versiondb_version
    2.912329
    2.8.110850
    2.7.19872
    2.79872
    2.6.58204
    2.6.38204
    2.6.28204
    2.6.18204
    2.68201
    2.5.17796
    2.57558
    2.3.36124
    2.3.26124
    2.3.16124
    2.36124
  • Open the PHP file version.php which is located in wp-include folder of your wordpress blog, and check the field $wp_db_version. It should be equal to the db_version of WP_Options table.
  • Below is the screenshot of version.php file from wp-include where you can see the $wp_db_version field as 9872 which refers to the wordpress version as 2.7.1
    5-17-2009 1-23-27 AM
    It should be equal to the db_version populated in WP_Options table. Here is the screenshot from the same table,
    5-17-2009 1-22-17 AM
  • If the fields are having same value, then the issue is with the Option_Name “siteurl” of WP_Options table. Check the value for the same. It should have the URL of your blog’s home page. Update the Option_Value of this field, and reload the home page of your blog. Here is the screenshot of WP_Options table showing the option_name “siteurl”,

siteurl

In case the problem is still there for your blog, then “check all” the  tables from the wordpress database and  select “Check Table” from the option list. Once done, then try to reload the blog’s page. Here is the screenshot for “Check Table” option,

phpmyadmin1

I hope that the problem related with your wordpress blog resolved by this time or you will have to restore the WP_Options table from previous backups. Please let us know your feedback thru comments section.

Sanjeev Mishra is a professional blogger and an Internet Marketing Consultant based in India. He has built the Internet Techies to provide you updates in technology and web application area.

Saturday, March 23, 2019

cara mengatasi Landingpress atau Elementor tidak bisa edit setelah menggunakan Cloudflare

cara mengatasi Landingpress atau Elementor tidak bisa edit setelah menggunakan Cloudflare

http://snifflevalve.com/elementor-tutorials/elementor-cloudflares-rocket-loader-not-play-well-together/

test

cara termudah...
pada saat mau edit dengan  Landingpress atau Elementor , setting di cloudflare dalam mode

Development Mode

Monday, July 30, 2018

How to Fix SSL Error When You Can’t Login to WordPress

http://www.beginwp.com/solve-ssl-error-login-issues-wordpress/

Errors and problems are something that we all face them sooner or later. However, these errors should not prevent us from trying or experimenting with something new. One of the strange issue that many users face is that when trying to login to WordPress, an SSL error is occurred. In this post, you’re going to learn how to fix SSL error when you’re unable to login to WordPress admin (or Dashboard).
So let’s take a look at all these SSL related problems in WordPress, along with their solutions.

SSL certificate

Have you recently activated SSL certificate on your site and are unable to login to WordPress? In such a case, ensure that you’ve correctly configured SSL certificate and settings related to it. Improperly configured SSL certificate may cause login issues.

Edit your wp-config.php file

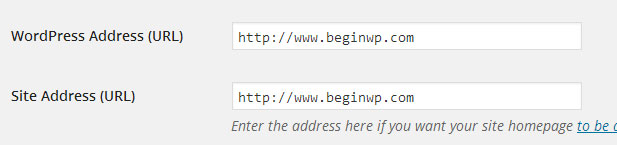
Some users make changes in: Settings > General, and update WordPress Address (URL) and Site Address (URL) from there. By mistake, you might have added HTTPS to the URL. For example; https://yoursite.com instead of http://yoursite.com
wp-url
If you’ve made these changes, then you won’t be able to login to WordPress. That’s why, you’ll now need to use a FTP client like Filezilla, or use your cPanel’s File Manager and edit your wp-config.php manually. Add these lines to your wp-config.php
define(‘WP_HOME’,’http://example.com’);
define(‘WP_SITEURL’,’http://example.com’);
Add these lines just before:
/* That’s all, stop editing! Happy blogging. */
Also replace example.com with your own domain name.

Check your .htaccess file

In your site’s root directory, such as domain.com/public_html, you’ll find a file named as .htaccess. In some cases, it might be hidden and you’ll need to checkmark “view hidden files” in the cPanel’s File Manager.
Ensure that your .htaccess looks like below:
?
1
2
3
4
5
6
7
8
9
10
11
# BEGIN WordPress
<IfModule mod_rewrite.c>
RewriteEngine On
RewriteBase /
RewriteRule ^index\.php$ - [L]
RewriteCond %{REQUEST_FILENAME} !-f
RewriteCond %{REQUEST_FILENAME} !-d
RewriteRule . /index.php [L]
</IfModule>
# END WordPress
If it doesn’t looks like this, then edit it and make the required changes.

Forcing HTTPS login in WordPress

Have you recently made any changes to the wp-config.php file to force HTTPS on the login page of WordPress.
define(‘FORCE_SSL_LOGIN’, true);
define(‘FORCE_SSL_ADMIN’, true);

If you’ve added any of the above constant in the wp-config.php file, then remove it from there.

Disable all plugins

Some security plugins such as iThemes Security (previously known as Better WP Security) have an option to force SSL on your site for only admin page, and for all pages or posts. If you’ve checkmarked this option in the plugin’s page, and if your server doesn’t supports SSL, then you won’t be able to login to WordPress because of SSL error. What now?
That’s where you’ll need to deactivate all plugins, or you can also rename one plugin at a time to see if that has solved your problem. Renaming the plugin will instantly deactivate the plugin, and that’s why problems arising out of that plugin will be fixed.
To disable all plugins at once, use FTP client or your host’s File Manager and navigate to wp-content folder. Rename the “plugins” folder to “plugins.hold”. This will deactivate all plugins instantly. If you’re now able to login then it means that a plugin is the culprit, and in such a case you’ll need to find that plugin and remove it.

Edit your WP_Options table

From your cPanel, login to your phpMyAdmin, go to your WP_Options table where you will find your site URL and home URL starting with HTTPS. You just need to edit it back to HTTP (by removing the “S”).
So go ahead and follow these methods when you’re getting SSL error on login page of WordPress. Hopefully these tips should be able to help you solve your problem.
Note: To help you fix your everyday WordPress problems and errors, we’ve also started a new WordPress troubleshooting section.