Monday, January 28, 2019

cara pasang control panel VPS dengan kloxo MR

https://idnetter.com/cara-install-kloxo-mr/

https://www.daiserver.com/blog/cara-install-kloxo-mr/

https://kmu.me/howto-install-kloxo-mr-hosting-control-panel-di-centos-7/

https://www.techrepublic.com/article/how-to-install-kloxo-mr-hosting-control-panel-on-centos/

Cara install Kloxo-MR

Panduan cara install Kloxo-MR 7.0.0 atau dinamai Kloxo-MR 7 (terbaru) di Linux CentOS 7. Agar instalasi Kloxo-MR berjalan lancar, sebaiknya anda mulai mengganti hostname agar memenuhi syarat FQDN (Fully Qualified Domain Name).

Prasyarat

Kloxo-MR bisa berjalan pada lingkungan operasi sistem berikut:
  • Redhat/CentOS 5 and 6 (32bit and 64bit) / Redhat/Centos 7
  • RAM 512 MB
  • Disk 10GB

Persiapan Install Kloxo-MR

Sebaiknya Anda sedang tidak buru-buru, ini dikarenakan fiturnya yang begitu banyak, maka banyak pula software yang akan diinstall dan ini membutuhkan waktu lumayan lama, setidaknya + – 20 menit-an.

Update system

yum update -y

Install paket pendukung

Langkah selanjutnya install program pendukung, misalnya wget, zip, unzip, telnet dll., jika belum ada.
yum install yum-utils yum-priorities vim-minimal subversion curl zip unzip -y
yum install telnet wget -y

Masuk ke direktori /tmp

cd /tmp

Hapus rpm lama, jika ada

rm -f mratwork*

Install rpm

rpm -ivh https://github.com/mustafaramadhan/rpms/raw/master/mratwork/release/neutral/noarch/mratwork-release-0.0.1-1.noarch.rpm

Masuk ke direktori /

cd /

Update

yum clean all

yum update mratwork-* -y

Install Kloxo-MR

yum install kloxomr7 -y
Run scriptnya
sh /script/upcp

Tampilan ketika berhasil
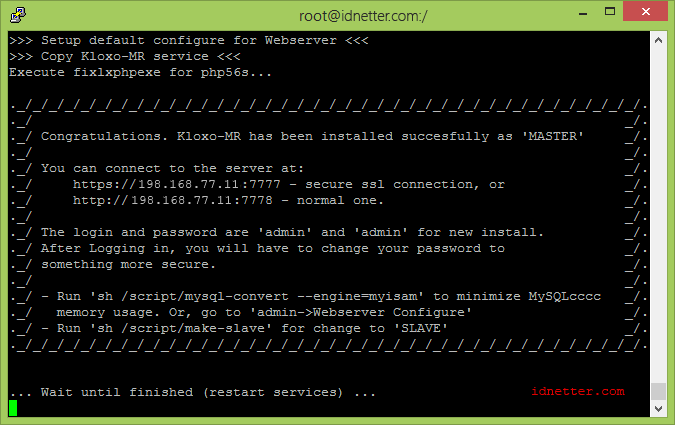
cara Install Kloxo-MR

Setelah selesai buka browser, akses : http://ip:7777 login dengan user:admin, password: admin

Screenshot

Dan ketika masuk, GlembarrrRR )))))))). Banyak kali menunya bukan?
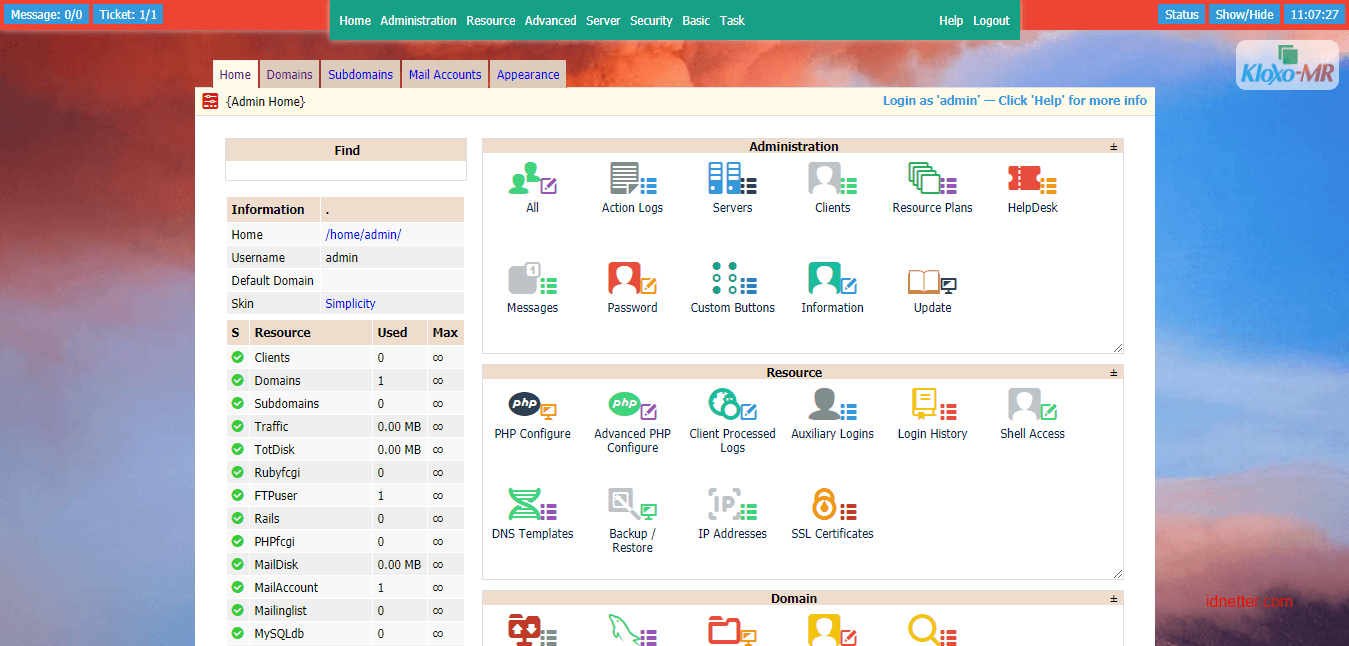
Kloxo-MR demo main page


Fitur Kloxo-MR

Fiturnya Kloxo-MR banyak atau mungkin bisa dibilang sangat sangat banyak :), diantaranya adalah sebagai berikut:
  • Billing: AWBS, WHMCS, HostBill, TheHostingTool, AccountLab Plus, Blesta and BoxBilling (note: claim by billing’s author)
  • Web server: Nginx, Nginx-Proxy and Lighttpd-proxy, Hiawatha, Hiawatha-proxy and Httpd 24, beside Httpd and Lighttpd; also Dual and Multiple Web server *)
  • Webcache server: Squid, Varnish and ATS *)
  • Php: Dual-php with php 5.3/5.4 as primary and php 5.2 as secondary; multiple-php *)
  • PHP-type for Apache: php-fpm_worker/_event and fcgid_worker/_event; beside mod_php/_ruid2/_itk and suphp/_worker/_event
  • Mail server: qmail-toaster instead special qmail (in progress: change from courier-imap to dovecot as imap/pop3) *)
  • Database: MySQL or MariaDB *)
  • Database Manager: PHPMyAdmin; Adminer, MyWebSql and SqlBuddy as additional **)
  • Webmail: Afterlogic Webmail Lite, Telaen, Squirrelmail, Roundcube and Rainloop; Horde and T-Dah dropped
  • FTP server: Pure-ftpd
  • DNS Server: Bind and Djbdns; add Powerdns, MaraDNS, NSD, myDNS and Yadifa *)
  • Addons: ClamAV, Spamassassin/Bogofilter/Spamdyke, RKHunter and MalDetect
  • Free SSL: Let’s Encrypt (via letsencrypt/certbot-auto and acme.sh) and StartAPI *)
  • Fixed many bugs of Kloxo Official (including security issues)
  • And many more!

Selamat mencoba.


Wednesday, December 12, 2018

After Restart Server Instances CentOS 7 .. All websites Down and Can't login to Server .. How to solve it? This is solution

After Restart Server Instances CentOS 7 .. All websites Down and Can't login to Server .. How to solve it? This is solution

I use vultr server.. but today  that server down after I restart server in CentOS 7 .

Frustration caused server down and all website down, can't login to server. Don't worry, this is solution..

1. contact to vultr using ticket to make you can see GRUB menu.
2. Find the kernel line (it starts with "linux16"), change ro to rw init=/sysroot/bin/sh
3. Press CTRL+X or F10 to boot single user mode.
4. Access the system with the command: chroot /sysroot
5. Edit /etc/selinux/config and change "enforcing" to "disabled" .. use method to edit Editing files with vi  

vi /etc/selinux/config
change "enforcing" to "disabled"
press  Escape
press :wq

6. reboot -f

Your server will reboot.. wait until display need login.. congrulation.. your server up now


Editing files with vi

https://www.control-escape.com/linux/editing-vim.html

The thing you have to understand about vi and its work-alike editors is modality. Most programs have just one mode, accepting input and placing it at the cursor. This is what you probably expect from a program. But vi has other modes. When you start vi, you’ll be in “Normal” mode, which is really command mode. When you are in Normal mode, whatever you type is considered not to be input, but commands that vi will try to execute.
This may sound a little crazy, but it is actually a very powerful way to edit documents. Even if you hate it, the ubiquity of vi means that you’re going to need to learn the basics, because sometimes you just have to use it. On the other hand, if you enjoy working at a command line, then you may end uploving vi.

Lesson 1: How to Quit vi

Since vi is the default editor, there’s a good chance you got dropped into it without knowing it. This can be extremely frustrating if you don’t know your way around the program.
To exit vi without saving changes, hit Escape a couple of times to ensure you are in Normal mode, and then type:
:q!

Lesson 2: Editing with vi

Start vi and press i. The cursor may change shape, and INSERT is displayed at the bottom of the screen (in most vi clones). You are now in insert mode — all your keystrokes are entered into the current buffer and are displayed to the screen.
Hit the Escape key. The cursor changes shape again, and INSERT has disappeared. You are back in Normal mode. Hitting Escape a few times will pretty much always cancel whatever you are doing and return you to Normal mode.
Command mode is also where you move around in the file. On most systems, you can use the arrow keys to move the cursor. If that fails, cursor movement can be accomplished with the hjkl keys:
h   move left one character
j   move down one character
k   move up one character
l   move right one character
vi has its own command line, which you access by typing a colon. Commands typed at the command line will not be executed until you hit Enter, just like in the shell.
Many of the commands that you will use in command mode begin with a colon. For example, the command to quit is :q, as we learned in Lesson 1 above. Actually, in Lesson 1 we added !, which tells vi to “force” the operation. If you have edited the file, typing :q will not immediately exit the program, but instead produce this error message:
E37: No write since last change (add ! to override)
To save your changes, use the :w command (“Write”). You can save and quit all in one go by typing both commands together:
:wq
Of course, if you started vi without giving a file name, you’ll need to provide one. For example, to save your working file as test.txt, you would type:
:w test.txt
Try editing some text now.
  • Start vi
  • Hit i to go to Insert mode.
  • Type some text.
  • Hit Escape to return to Normal mode.
  • Type :w test.txt to save your work
  • Type :q to quit

vi Quick Reference

Movement

hjkl
left, down, up, right
$
To the end of the line
^
To the beginning of the line
G
To the end of the file
:1
To the beginning of the file
:47
To line 47

Editing

dd
Remove a line
5dd
Removing five lines
r
Replace a character
x
Delete a character
5x
Delete 5 characters
u
Undo last action
J
Join current and next lines (Note the capital — hold the Shift key)

Saving and Quitting

:q
Quit
:q!
Quit without saving
:wq
Write and quit
:w
Write (without quitting)
:e!
Reload currently open file from disk
:w test.txt
Write buffer to file test.txt
:e test2.txt
Open file test2.txt

Friday, August 24, 2018

Install Composer on CentOS 7

https://www.vultr.com/docs/install-composer-on-centos-7

Published on: Tue, Oct 18, 2016 at 6:43 pm EST

Introduction

Composer is a tool for dependency management in PHP. It allows you to declare the libraries your project depends on and it will manage (install/update) them for you.

Requirements

  • CentOS 7
  • cURL
  • PHP (including php-cli)

Installation

The installation process of Composer is relatively simple. First, let's get in the good habit of updating our server.
# sudo yum -y update
Switch into the temp directory.
# cd /tmp
Install Composer using cURL
# sudo curl -sS https://getcomposer.org/installer | php
Want to make Composer globally accessible?
# mv composer.phar /usr/local/bin/composer

Conclusion

Composer is an essential tool for any PHP developer. It is very easy to install and you will save countless hours over the years automating your dependencies. Happy developing!

Sunday, August 12, 2018

Using KDE Connect to Sync your Android Device with Your Linux Computer


https://www.makeuseof.com/tag/kde-connect-sync-android-linux/
http://www.webupd8.org/2017/04/new-kde-connect-indicator-ubuntu-linux.html
https://ubuntuforums.org/showthread.php?t=1654068
https://www.omgubuntu.co.uk/2017/01/kde-connect-indicator-ubuntu

Friday, August 10, 2018

Install Imagick in Centos and Solved Problem

https://www.linuxhelp.com/how-to-install-php-imagemagick-on-centos-7/
https://www.scalescale.com/tips/nginx/install-imagemagick-php-imagick-centos/

If your terminal display saved mode, for example
Is this ok [y/d/N]: Exiting on user command
Your transaction was saved, rerun it with:
 yum load-transaction /tmp/yum_save_tx.2018-08-11.02-13.LmDUjC.yumtx


use -y in command become
yum -y install php-devel

https://www.linuxquestions.org/questions/linux-newbie-8/yum-installation-fails-because-of-a-saved-transaction-4175585216/